
徒手撸一个注解框架
运行时注解主要是通过反射来实现的,而编译时注解则是在编译期间帮助我们生成代码,所以编译时注解效率高,但是实现起来复杂一点,运行时注解效率较低,但是实现起来简单。 首先来看下运行时注解怎么实现的吧。
1.运行时注解
1.1定义注解
首先定义两个运行时注解,其中Retention标明此注解在运行时生效,Target标明此注解的程序元范围,下面两个示例RuntimeBindView用于描述成员变量和类,成员变量绑定view,类绑定layout;RuntimeBindClick用于描述方法,让指定的view绑定click事件。
@Retention(RetentionPolicy.RUNTIME)//运行时生效
@Target({ElementType.FIELD,ElementType.TYPE})//描述变量和类
public @interface RuntimeBindView {
    int value() default View.NO_ID;
}

@Retention(RetentionPolicy.RUNTIME)//运行时生效
@Target(ElementType.METHOD)//描述方法
public @interface RuntimeBindClick {
    int[] value();
}
1.2反射实现
以下代码是用反射实现的注解功能,其中ClassInfo是一个能解析处类的各种成员和方法的工具类, 源码见github.com/huangbei199… 其实逻辑很简单,就是从Activity里面取出指定的注解,然后再调用相应的方法,如取出RuntimeBindView描述类的注解,然后得到这个注解的返回值,接着调用activity的setContentView将layout的id设置进去就可以了。
public static void bindId(Activity obj){
    ClassInfo clsInfo = new ClassInfo(obj.getClass());
    //处理类
    if(obj.getClass().isAnnotationPresent(RuntimeBindView.class)) {
        RuntimeBindView bindView = (RuntimeBindView)clsInfo.getClassAnnotation(RuntimeBindView.class);
        int id = bindView.value();
        clsInfo.executeMethod(clsInfo.getMethod("setContentView",int.class),obj,id);
    }

    //处理类成员
    for(Field field : clsInfo.getFields()){
        if(field.isAnnotationPresent(RuntimeBindView.class)){
            RuntimeBindView bindView = field.getAnnotation(RuntimeBindView.class);
            int id = bindView.value();
            Object view = clsInfo.executeMethod(clsInfo.getMethod("findViewById",int.class),obj,id);
            clsInfo.setField(field,obj,view);
        }
    }

    //处理点击事件
    for (Method method : clsInfo.getMethods()) {
        if (method.isAnnotationPresent(RuntimeBindClick.class)) {
            int[] values = method.getAnnotation(RuntimeBindClick.class).value();
            for (int id : values) {
                View view = (View) clsInfo.executeMethod(clsInfo.getMethod("findViewById", int.class), obj, id);
                view.setOnClickListener(v -> {
                    try {
                        method.invoke(obj, v);
                    } catch (Exception e) {
                        e.printStackTrace();
                    }
                });
            }
        }
    }
}
1.3使用
如下所示,将我们定义好的注解写到相应的位置,然后调用BindApi的bind函数,就可以了。很简单吧
@RuntimeBindView(R.layout.first)//类
public class MainActivity extends AppCompatActivity {

    @RuntimeBindView(R.id.jump)//成员
    public Button jump;

    @Override
    protected void onCreate(Bundle savedInstanceState) {
        super.onCreate(savedInstanceState);
        BindApi.bindId(this);//调用反射
    }

    @RuntimeBindClick({R.id.jump,R.id.jump2})//方法
    public void onClick(View view){
        Intent intent = new Intent(this,SecondActivity.class);
        startActivity(intent);
    }
}
2.编译时注解
编译时注解就是在编译期间帮你自动生成代码,其实原理也不难。
2.1定义注解
我们可以看到,编译时注解定义的时候Retention的值和运行时注解不同。
@Retention(RetentionPolicy.CLASS)//编译时生效
@Target({ElementType.FIELD,ElementType.TYPE})//描述变量和类
public @interface CompilerBindView {
    int value() default -1;
}

@Retention(RetentionPolicy.CLASS)//编译时生效
@Target(ElementType.METHOD)//描述方法
public @interface CompilerBindClick {
    int[] value();
}
2.2根据注解生成代码
1)准备工作
首先我们要新建一个java的lib库,因为接下需要继承AbstractProcessor类,这个类Android里面没有。
然后我们需要引入两个包,javapoet是帮助我们生成代码的包,auto-service是帮助我们自动生成META-INF等信息,这样我们编译的时候就可以执行我们自定义的processor了。
apply plugin: 'java-library'

dependencies {
    implementation fileTree(dir: 'libs', include: ['*.jar'])
    api 'com.squareup:javapoet:1.9.0'
    api 'com.google.auto.service:auto-service:1.0-rc2'
}


sourceCompatibility = "1.8"
targetCompatibility = "1.8"
2)继承AbstractProcessor
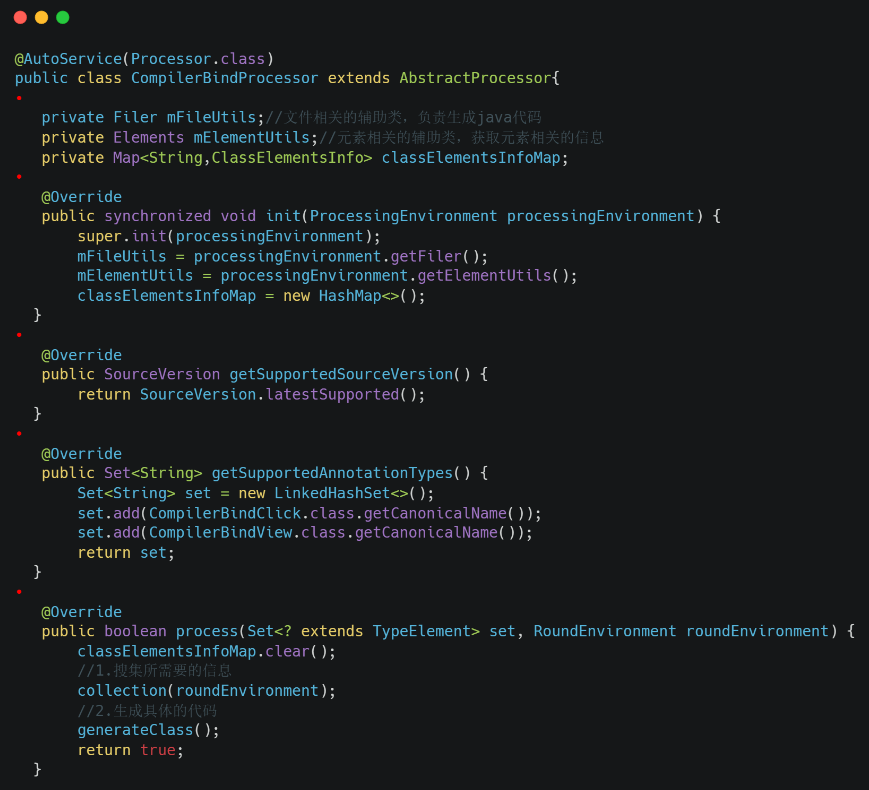
如下所示,我们需要自定义一个类继承子AbstractProcessor并复写他的方法,并加上AutoService的注解。 ClassElementsInfo是用来存储类信息的类,这一步先暂时不用管,下一步会详细说明。 其实从函数的名称就可以看出是什么意思,init初始化,getSupportedSourceVersion限定所支持的jdk版本,getSupportedAnnotationTypes需要处理的注解,process我们可以在这个函数里面拿到拥有我们需要处理注解的类,并生成相应的代码。
3)搜集注解
首先我们看下ClassElementsInfo这个类,也就是我们需要搜集的信息。 TypeElement为类元素,VariableElement为成员元素,ExecutableElement为方法元素,从中我们可以获取到各种注解信息。 classSuffix为前缀,例如原始类为MainActivity,注解生成的类名就为MainActivity+classSuffix
public class ClassElementsInfo {

    //类
    public TypeElement mTypeElement;
    public int value;
    public String packageName;

    //成员,key为id
    public Map<Integer,VariableElement> mVariableElements = new HashMap<>();

    //方法,key为id
    public Map<Integer,ExecutableElement> mExecutableElements = new HashMap<>();

    //后缀
    public static final String classSuffix = "proxy";

    public String getProxyClassFullName() {
        return mTypeElement.getQualifiedName().toString() + classSuffix;
    }
    public String getClassName() {
        return mTypeElement.getSimpleName().toString() + classSuffix;
    }
    ......
}
然后我们就可以开始搜集注解信息了, 如下所示,按照注解类型一个一个的搜集,可以通过roundEnvironment.getElementsAnnotatedWith函数拿到注解元素,拿到之后再根据注解元素的类型分别填充到ClassElementsInfo当中。 其中ClassElementsInfo是存储在Map当中,key是String是classPath。
private void collection(RoundEnvironment roundEnvironment){
    //1.搜集compileBindView注解
    Set<? extends Element> set = roundEnvironment.getElementsAnnotatedWith(CompilerBindView.class);
    for(Element element : set){
        //1.1搜集类的注解
        if(element.getKind() == ElementKind.CLASS){
            TypeElement typeElement = (TypeElement)element;
            String classPath = typeElement.getQualifiedName().toString();
            String className = typeElement.getSimpleName().toString();
            String packageName = mElementUtils.getPackageOf(typeElement).getQualifiedName().toString();
            CompilerBindView bindView = element.getAnnotation(CompilerBindView.class);
            if(bindView != null){
                ClassElementsInfo info = classElementsInfoMap.get(classPath);
                if(info == null){
                    info = new ClassElementsInfo();
                    classElementsInfoMap.put(classPath,info);
                }
                info.packageName = packageName;
                info.value = bindView.value();
                info.mTypeElement = typeElement;
            }
        }
        //1.2搜集成员的注解
        else if(element.getKind() == ElementKind.FIELD){
            VariableElement variableElement = (VariableElement) element;
            String classPath = ((TypeElement)element.getEnclosingElement()).getQualifiedName().toString();
            CompilerBindView bindView = variableElement.getAnnotation(CompilerBindView.class);
            if(bindView != null){
                ClassElementsInfo info = classElementsInfoMap.get(classPath);
                if(info == null){
                    info = new ClassElementsInfo();
                    classElementsInfoMap.put(classPath,info);
                }
                info.mVariableElements.put(bindView.value(),variableElement);
            }
        }
    }

    //2.搜集compileBindClick注解
    Set<? extends Element> set1 = roundEnvironment.getElementsAnnotatedWith(CompilerBindClick.class);
    for(Element element : set1){
        if(element.getKind() == ElementKind.METHOD){
            ExecutableElement executableElement = (ExecutableElement) element;
            String classPath = ((TypeElement)element.getEnclosingElement()).getQualifiedName().toString();
            CompilerBindClick bindClick = executableElement.getAnnotation(CompilerBindClick.class);
            if(bindClick != null){
                ClassElementsInfo info = classElementsInfoMap.get(classPath);
                if(info == null){
                    info = new ClassElementsInfo();
                    classElementsInfoMap.put(classPath,info);
                }
                int[] values = bindClick.value();
                for(int value : values) {
                    info.mExecutableElements.put(value,executableElement);
                }
            }
        }
    }
}
4)生成代码
如下所示使用javapoet生成代码,使用起来并不复杂。
public class ClassElementsInfo {
    ......
    public String generateJavaCode() {
        ClassName viewClass = ClassName.get("android.view","View");
        ClassName clickClass = ClassName.get("android.view","View.OnClickListener");
        ClassName keepClass = ClassName.get("android.support.annotation","Keep");
        ClassName typeClass = ClassName.get(mTypeElement.getQualifiedName().toString().replace("."+mTypeElement.getSimpleName().toString(),""),mTypeElement.getSimpleName().toString());

        //构造方法
        MethodSpec.Builder builder = MethodSpec.constructorBuilder()
                .addModifiers(Modifier.PUBLIC)
                .addParameter(typeClass,"host",Modifier.FINAL);
        if(value > 0){
            builder.addStatement("host.setContentView($L)",value);
        }

        //成员
        Iterator<Map.Entry<Integer,VariableElement>> iterator = mVariableElements.entrySet().iterator();
        while(iterator.hasNext()){
            Map.Entry<Integer,VariableElement> entry = iterator.next();
            Integer key = entry.getKey();
            VariableElement value = entry.getValue();
            String name = value.getSimpleName().toString();
            String type = value.asType().toString();
            builder.addStatement("host.$L=($L)host.findViewById($L)",name,type,key);
        }

        //方法
        Iterator<Map.Entry<Integer,ExecutableElement>> iterator1 = mExecutableElements.entrySet().iterator();
        while(iterator1.hasNext()){
            Map.Entry<Integer,ExecutableElement> entry = iterator1.next();
            Integer key = entry.getKey();
            ExecutableElement value = entry.getValue();
            String name = value.getSimpleName().toString();
            MethodSpec onClick = MethodSpec.methodBuilder("onClick")
                    .addAnnotation(Override.class)
                    .addModifiers(Modifier.PUBLIC)
                    .addParameter(viewClass,"view")
                    .addStatement("host.$L(host.findViewById($L))",value.getSimpleName().toString(),key)
                    .returns(void.class)
                    .build();
            //构造匿名内部类
            TypeSpec clickListener = TypeSpec.anonymousClassBuilder("")
                    .addSuperinterface(clickClass)
                    .addMethod(onClick)
                    .build();
            builder.addStatement("host.findViewById($L).setOnClickListener($L)",key,clickListener);
        }

        TypeSpec typeSpec = TypeSpec.classBuilder(getClassName())
                .addModifiers(Modifier.PUBLIC)
                .addAnnotation(keepClass)
                .addMethod(builder.build())
                .build();
        JavaFile javaFile = JavaFile.builder(packageName,typeSpec).build();
        return javaFile.toString();
    }
}
最终使用了注解之后生成的代码如下
package com.android.hdemo;

import android.support.annotation.Keep;
import android.view.View;
import android.view.View.OnClickListener;
import java.lang.Override;

@Keep
public class MainActivityproxy {
  public MainActivityproxy(final MainActivity host) {
    host.setContentView(2131296284);
    host.jump=(android.widget.Button)host.findViewById(2131165257);
    host.findViewById(2131165258).setOnClickListener(new View.OnClickListener() {
      @Override
      public void onClick(View view) {
        host.onClick(host.findViewById(2131165258));
      }
    });
    host.findViewById(2131165257).setOnClickListener(new View.OnClickListener() {
      @Override
      public void onClick(View view) {
        host.onClick(host.findViewById(2131165257));
      }
    });
  }
}
5)让注解生效
我们生成了代码之后,还需要让原始的类去调用我们生成的代码
public class BindHelper {

    static final Map<Class<?>,Constructor<?>> Bindings = new HashMap<>();

    public static void inject(Activity activity){
        String classFullName = activity.getClass().getName() + ClassElementsInfo.classSuffix;
        try{
            Constructor constructor = Bindings.get(activity.getClass());
            if(constructor == null){
                Class proxy = Class.forName(classFullName);
                constructor = proxy.getDeclaredConstructor(activity.getClass());
                Bindings.put(activity.getClass(),constructor);
            }
            constructor.setAccessible(true);
            constructor.newInstance(activity);
        }catch (Exception e){
            e.printStackTrace();
        }
    }
}
2.3调试
首先在gradle.properties里面加入如下的代码
android.enableSeparateAnnotationProcessing = true
org.gradle.daemon=true
org.gradle.jvmargs=-agentlib:jdwp=transport=dt_socket,server=y,suspend=n,address=8888
然后点击Edit Configurations
新建一个remote
然后填写相关的参数,127.0.0.1表示本机,port与刚才gradle.properties里面填写的保持一致,然后点击ok
然后将Select Run/Debug Configuration选项调整到刚才新建的Configuration上,然后点击Build--Rebuild Project,就可以开始调试了。
2.4使用
如下所示为原始的类
@CompilerBindView(R.layout.first)
public class MainActivity extends AppCompatActivity {

    @CompilerBindView(R.id.jump)
    public Button jump;

    @Override
    protected void onCreate(Bundle savedInstanceState) {
        super.onCreate(savedInstanceState);
        BindHelper.inject(this);
    }

    @CompilerBindClick({R.id.jump,R.id.jump2})
    public void onClick(View view){
        Intent intent = new Intent(this,SecondActivity.class);
        startActivity(intent);
    }
}
以下为生成的类
package com.android.hdemo;

import android.support.annotation.Keep;
import android.view.View;
import android.view.View.OnClickListener;
import java.lang.Override;

@Keep
public class MainActivityproxy {
  public MainActivityproxy(final MainActivity host) {
    host.setContentView(2131296284);
    host.jump=(android.widget.Button)host.findViewById(2131165257);
    host.findViewById(2131165258).setOnClickListener(new View.OnClickListener() {
      @Override
      public void onClick(View view) {
        host.onClick(host.findViewById(2131165258));
      }
    });
    host.findViewById(2131165257).setOnClickListener(new View.OnClickListener() {
      @Override
      public void onClick(View view) {
        host.onClick(host.findViewById(2131165257));
      }
    });
  }
}
3.总结
注解框架看起来很高大上,其实弄懂之后也不难,都是一个套路。
作者:我是黄大仙
来源:juejin.cn/post/7180166142093656120
