
iOS逆向(8)-Monkey、Logos
由于最近微信大佬发飙,罚了红包外挂5000万大洋,这就让人很慌了,别说罚我5000万,5000块我都吃不消。所以笔者决定以后不用微信做例子了。换成优酷了😈。
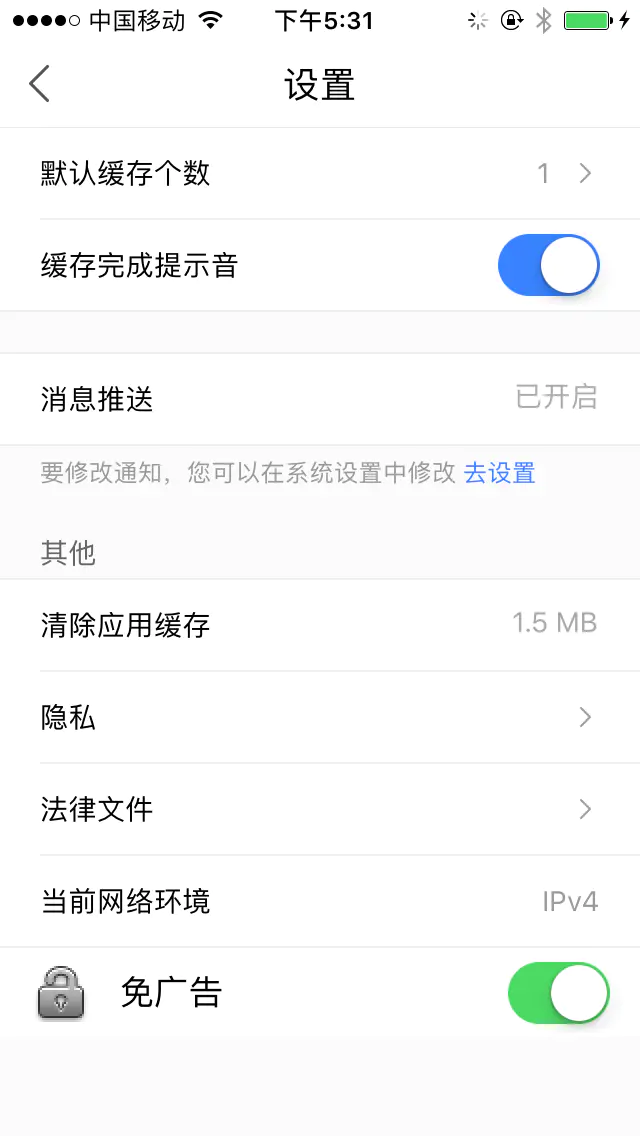
本文会对优酷的设置页面增加一个开启/关闭屏蔽广告的Cell(仅UI)。效果可见下文配图。
在之前的几篇文章里已经介绍了APP重签名,代码注入,Hook原理,可以发现,将工程建好,脚本写好,我们就可以以代价非常小的方式对一个第三方的APP进行分析。
那么是否一种工具,可以将重签名,代码注入,Hook源代码,class-dump,Cydia Substrate,甚至是恢复符号表这些功能,集成在一个工程里面,让真正的逆向小白也能享受逆向的乐趣呢?
答案是肯定的,Monkey就是这样的一个非越狱插件开发集成神器!
老规矩,片头先上福利:点击下载demo。
这篇文章会用到的工具有:
1、MonkeyDev
2、博主自己砸壳的优酷ipa包 提取码: xtua
3、砸壳后的SimpleAppDemo.ipa 提取码: afnc
一、Monkey
什么是Monkey?
原有iOSOpenDev的升级,非越狱插件开发集成神器!
可以使用Xcode开发CaptainHook Tweak、Logos Tweak 和 Command-line Tool,在越狱机器开发插件,这是原来iOSOpenDev功能的迁移和改进。
1、只需拖入一个砸壳应用,自动集成class-dump、restore-symbol、* Reveal、Cycript和注入的动态库并重签名安装到非越狱机器。
2、支持调试自己编写的动态库和第三方App
3、支持通过CocoaPods第三方应用集成SDK以及非越狱插件,简单来说就是通过CocoaPods搭建了一个非越狱插件商店。
环境要求
使用工具前确保如下几点:
1、安装最新的theos
sudo git clone --recursive https://github.com/theos/theos.git /opt/theos2、安装ldid(如安装theos过程安装了ldid,跳过)
brew install ldid安装
你可以通过以下命令选择指定的Xcode进行安装:
sudo xcode-select -s /Applications/Xcode-beta.app默认安装的Xcode为:
xcode-select -p执行安装命令:
sudo /bin/sh -c "$(curl -fsSL https://raw.githubusercontent.com/AloneMonkey/MonkeyDev/master/bin/md-install)"卸载
sudo /bin/sh -c "$(curl -fsSL https://raw.githubusercontent.com/AloneMonkey/MonkeyDev/master/bin/md-uninstall)"更新
如果没有发布特殊说明,使用如下命令更新即可:
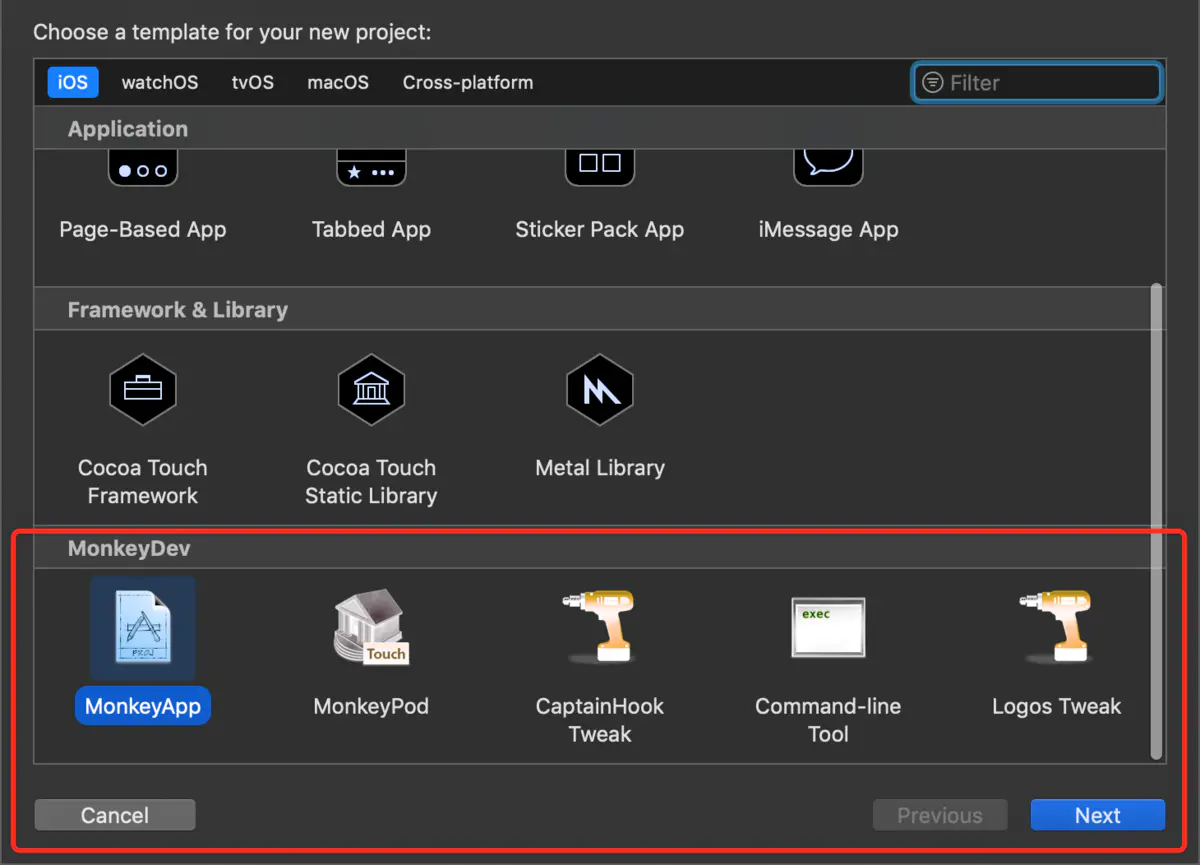
sudo /bin/sh -c "$(curl -fsSL https://raw.githubusercontent.com/AloneMonkey/MonkeyDev/master/bin/md-update)"安装/更新之后重启下Xcode再新建项目。如果看到如下选项,即代表安装成功,如果没有,重复上面步骤再来一遍。
二、Logos
Logos是Thoes开发的一套组件,可非常方便用于的Hook OC代码。
接下来我们就介绍下Logos的简单用法,最后运用Monkey和Logos给优酷增加一点UI。
1、创建一个简单的工程
创建工程SimpleAppDemo,里面只有一个按钮,点击按钮弹出一个Alert。 点击下载:SimpleAppDemo
按钮对应的方法为:
- (IBAction)tapAction:(id)sender {
    UIAlertView *alert = [[UIAlertView alloc] initWithTitle:@"来啦" message:@"老弟😁😁😁" delegate:nil cancelButtonTitle:@"我知道了" otherButtonTitles:nil, nil];
    [alert show];
}
2、砸壳
对SimpleAppDemo参数的ipa文件进行砸壳,砸壳过程就不在这详细描述了,这里有笔者已经砸壳好的ipa:SimpleAppDemo.ipa 提取码: afnc
3、新建一个Monkey工程
取名LogosDemo,将下面下载好的SimpleAppDemo.ipa,放到工程对应的目录下:

配好证书(随意一个能在手机上运行的证书即可),Run。运行成功~
4、玩转Logos
在上一步建好的Monkey工程中,可以发现在目录有一个Logos目录:
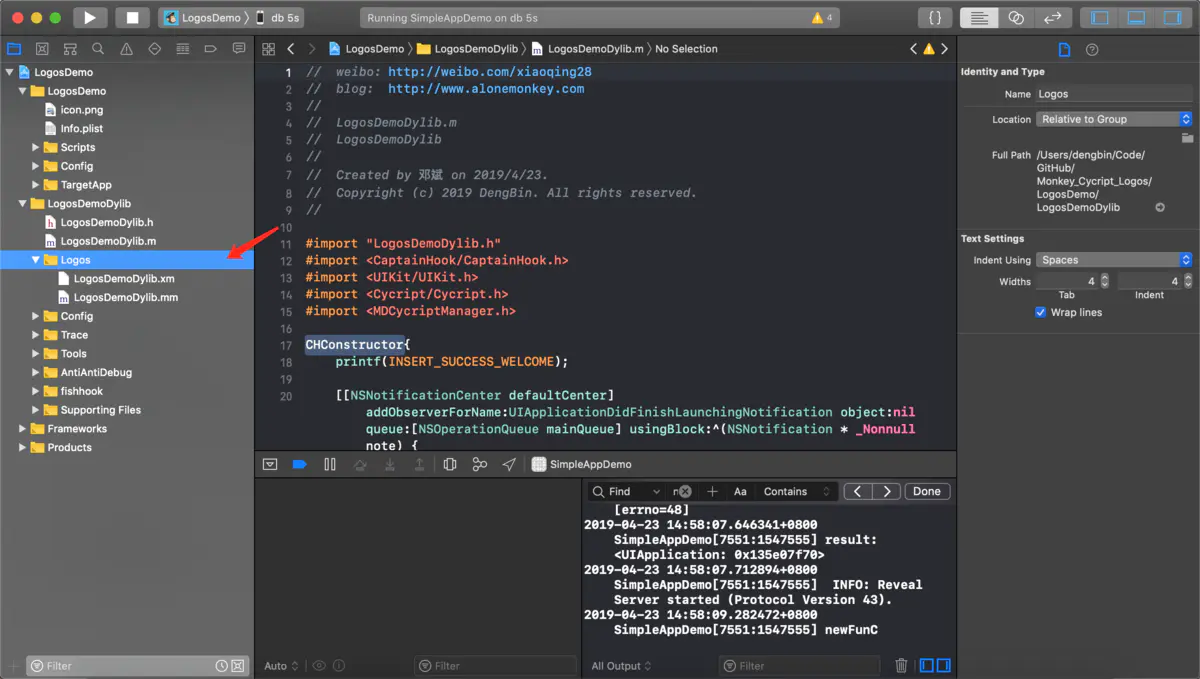
默认有两个文件LogosDemoDylib.xm和LogosDemoDylib.mm。
其中Logos语句就是写在LogosDemoDylib.xm中的,LogosDemoDylib.mm是根据LogosDemoDylib.xm中的内容自动生成的。
接下来,咱们根据几个需求来介绍Logos的一些常用的用法。
1、更改点击按钮的弹框内容(hook)
由于需要更改弹窗,所以首先导入UIKit框架。
#import <UIKit/UIKit.h>由于咱们手上有源码,所以可以直接跳过动态分析的这一步,直接就知道按钮所处的页面是叫做ViewController,按钮的响应方法是:
- (IBAction)tapAction:(id)sender利用hook命令:
#import <UIKit/UIKit.h>

// hook + 类名
%hook ViewController
// IBAction == void
- (void)tapAction:(id)sender {
    UIAlertView *alert = [[UIAlertView alloc] initWithTitle:@"来什么来" message:@"😡😡😡" delegate:nil cancelButtonTitle:@"我知道了" otherButtonTitles:nil, nil];
    [alert show];
}

%end
运行项目,发现按钮已经被成功hook了。

2、调用原方法(orig)
#import <UIKit/UIKit.h>

%hook ViewController

- (void)tapAction:(id)sender {
    UIAlertView *alert = [[UIAlertView alloc] initWithTitle:@"来什么来" message:@"😡😡😡" delegate:nil cancelButtonTitle:@"我知道了" otherButtonTitles:nil, nil];
    [alert show];
    // 调用原方法
    %orig;
}

%end
3、新增一个方法,并且调用(new)
由于在Monkey工程里面是编译不到源码的,所以无论是新增的方法,还是调用原工程中的方法,都是无法通过编译的,所以都需要使用interface申明每一个方法。
#import <UIKit/UIKit.h>

// 这里只是为了申明
@interface ViewController

- (void)newFunC;

@end

%hook ViewController

// 新增方法关键字new
%new
- (void)newFunC{
    NSLog(@"newFunC");
}

// IBAction == void
- (void)tapAction:(id)sender {
    UIAlertView *alert = [[UIAlertView alloc] initWithTitle:@"来什么来" message:@"😡😡😡" delegate:nil cancelButtonTitle:@"我知道了" otherButtonTitles:nil, nil];
    [alert show];
    [self newFunC];
    // 调用原方法关键字orig
    %orig;
}

%end文中所有的Demo都在这可以下载到:Dmoe
Logos除了以上hook,end,orig,new这几种关键字,还有:
%subclass:增加一个类
%log:打印,类似NSLog
%group: 给代码分组,可以用于在不同环境加载不同的代码,比如iOS8加载group1,iOS9加载group2,如果部分中,默认所有代码在名为「_ungrouped」的隐藏分组中。
...
所有的Logos语法都可以在官方文档中查询得到。
5、给优酷加UI
首先在这里下载笔者自己砸壳后优酷ipa包(arm64架构的):优酷(砸壳).ipa 提取码: xtua
Step 1、新建工程YouKu
同样的新建一个Monkey工程,取名YouKu,将下载好的ipa包放入工程对应的TargetApp目录下。Run。同样是重签名成功。
在上面的Demo中,我们是对我们直接的工程进行HOOK,由于我们手上有源码,所以我们越过了最难的一个步骤:动态分析。
而我们现在要对优酷进行Hook,但我们手上是没有优酷的源码的,所以此时此刻就需要对其进行动态分析了。
下面我将结合Xcode和class dump对优酷的设置页面简单的进行分析。
Step 2、class dump
class-dump is a command-line utility for examining the Objective-C segment of Mach-O files. It generates declarations for the classes, categories and protocols. This is the same information provided by using 'otool -ov', but presented as normal Objective-C declarations.
简单说就是一个可以导出一个MachO文件的所有头文件信息(包括Extension)
在文首有提到Monkey除了重签名,还集成了class dump的功能,所以我们需要做的就仅仅是开启这个功能:
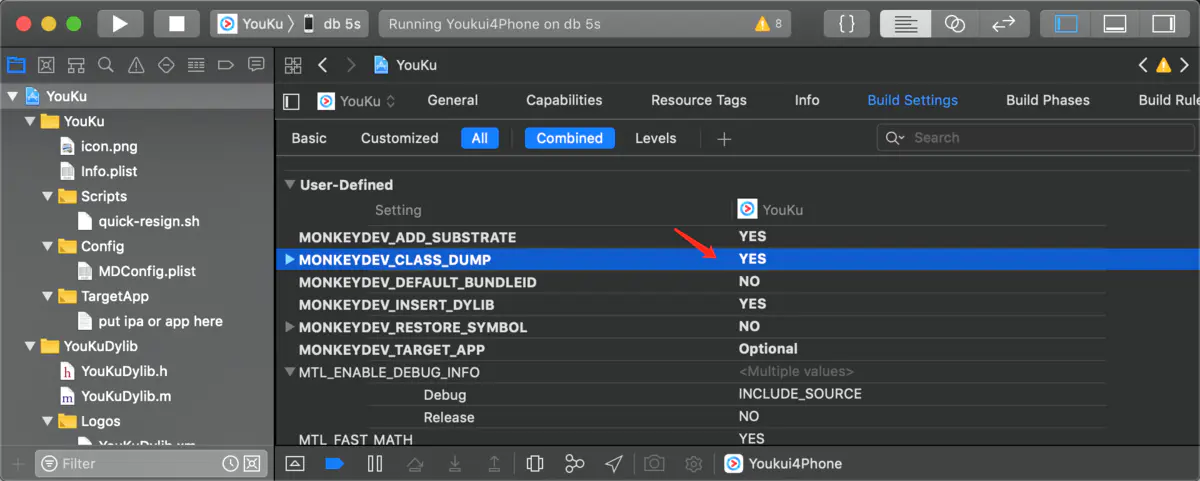
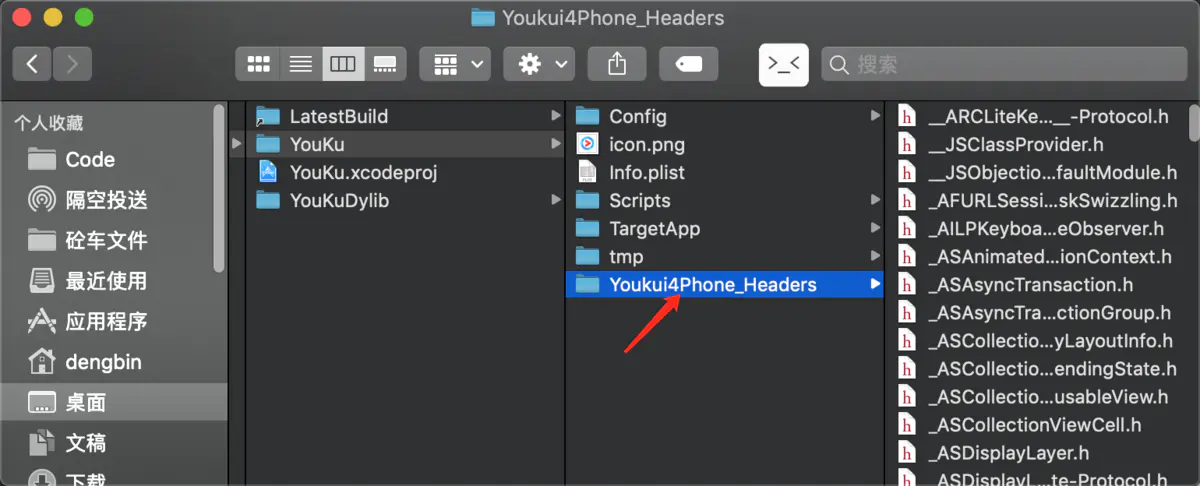
Run!成功之后可以发现在工程目录下多了一个文件夹Youkui4Phone_Headers,其中就是优酷的所有的头文件了。
Step 3、分析优酷设置页面
工程Run成功后,点击进入设置页面(不用登录),如下图:
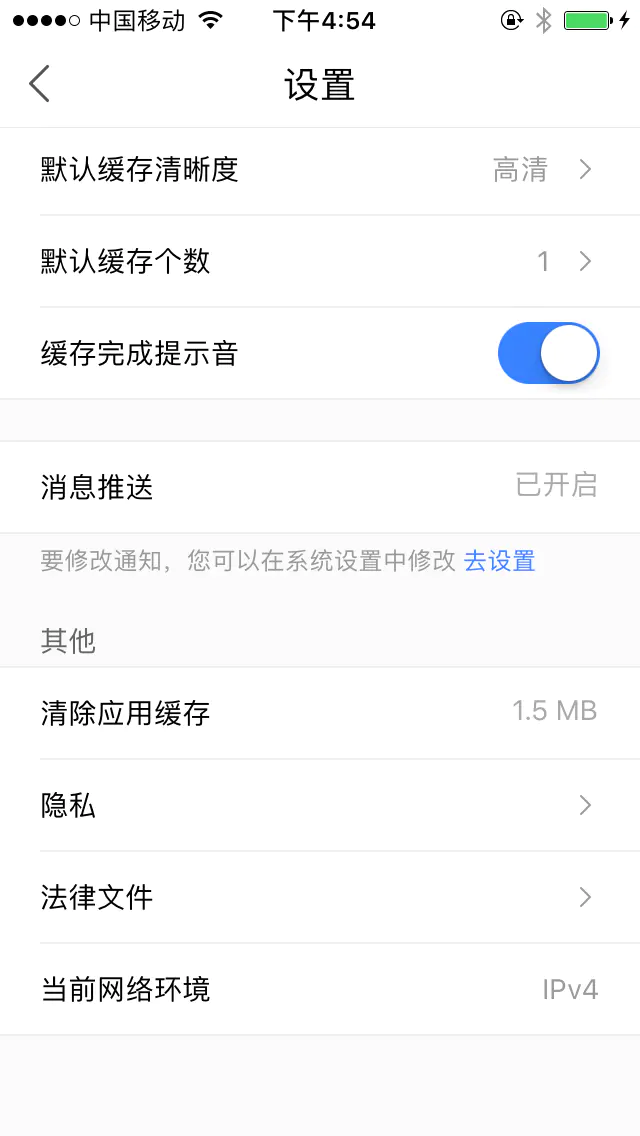
我们现在要做的就是在这个页面的TableView的最后一行加上Cell,里面有个Switch,用于打开/关闭屏蔽广告功能(只是UI,这篇文章不牵扯到屏蔽广告的具体实现,如果你需要,点个小心心,持续关注我哦😀😀😀)。
利用伟大的Xcode我们可以非常清晰的看到,设置页面的DataSource和Delegate都是在SettingViewController中,
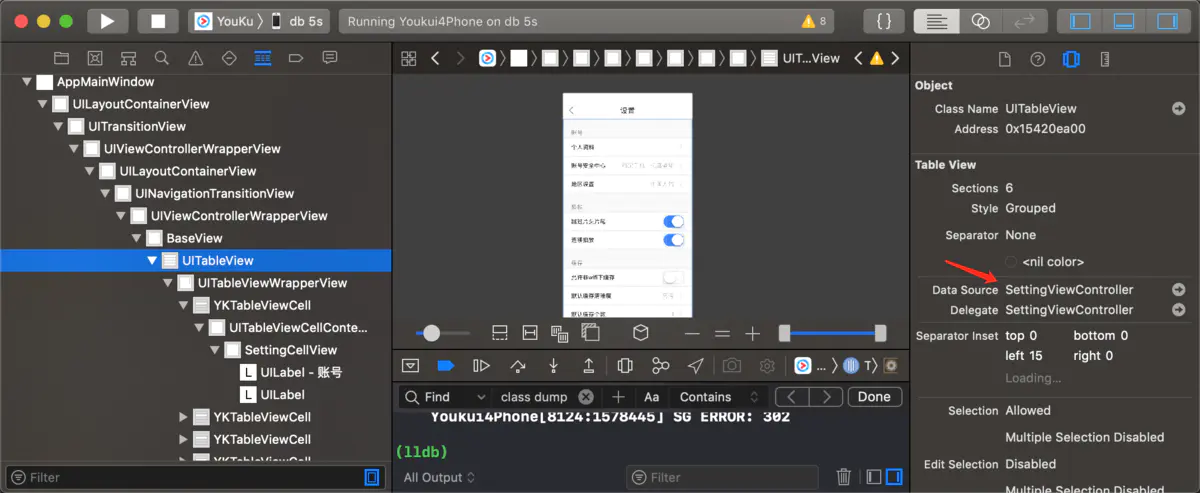
咱们就找到Hook的类名:SettingViewController
需要Hook的方法自然就是TableView的那些DataSource和Delegate了。
这里需要额外提到的一点是,在文章开始的时候就说了Monkey已经将Cydia Substrate集成进去了,所以我们可以直接使用Cydia Substrate的相关功能了。
在这里我们需要拿到这个页面TableView的对应的变量,我们就需要使用到Cydia Substrate的功能了。打开上文中获取到优酷的所有的头文件,所有SettingViewController,发现其只有一个TableView变量:_tabview。
那么毫无疑问,就是他了!
而获取它的方法是:
MSHookIvar <UITableView *>(self,"_tabview")一个reloadData的简单使用:
[MSHookIvar <UITableView *>(self,"_tabview") reloadData];其他的UI代码在这里就不一一解释了,全部代码如下,当然在Demo中也是有的,其中包括了数据的简单持久化功能:
#import <UIKit/UIKit.h>
#define FYDefaults  [NSUserDefaults standardUserDefaults]
#define FYSwitchUserDefaultsKey @"FYSwitchUserDefaultsKey"

@interface SettingViewController
- (long long)numberOfSectionsInTableView:(id)arg1;
@end

%hook SettingViewController

%new
-(void)switchChangeAction:(UISwitch *)switchView{
    [FYDefaults setBool:switchView.isOn forKey:FYSwitchUserDefaultsKey];
    [FYDefaults synchronize];
    [MSHookIvar <UITableView *>(self,"_tabview") reloadData];
}

//多少组
- (long long)numberOfSectionsInTableView:(id)arg1{
    UITableView * tableView = MSHookIvar <UITableView *>(self,"_tabview");
    NSLog(@"fy_numberOfSectionsInTableView:");
    // 额外增加一个
    return %orig+1;
}

//每组多少行
- (long long)tableView:(UITableView *)tableView numberOfRowsInSection:(long long)section{
    NSLog(@"fy_numberOfRowsInSection:");
    //定位设置界面,并且是最后一个
    if(section == [self numberOfSectionsInTableView:tableView]-1){
        return 1;
    }
    else{
        return %orig;
    }
}

//返回高度
- (double)tableView:
(UITableView *)tableView heightForRowAtIndexPath:(id)indexPath{
    NSLog(@"fy_heightForRowAtIndexPath:");
    //定位设置界面,并且是最后一个
    if([indexPath section] ==[self numberOfSectionsInTableView:tableView]-1){
        return 44;
    }
    else{
        return %orig;
    }
}


//每一个Cell
- (id)tableView:(UITableView *)tableView cellForRowAtIndexPath:(id)indexPath{
    NSLog(@"fy_cellForRowAtIndexPath:");
    //定位设置界面,并且是最后一组
    if([indexPath section] == [self numberOfSectionsInTableView:tableView]-1){
        UITableViewCell * cell = nil;
        if([indexPath row] == 0){
            static NSString *swCell = @"SwCellIdentifier";
            cell = [tableView dequeueReusableCellWithIdentifier:swCell];
            if(!cell){
                cell = [[UITableViewCell alloc] initWithStyle:(UITableViewCellStyleDefault) reuseIdentifier:nil];
            }
            cell.textLabel.text = @"免广告";
            // 免广告开关
            UISwitch *switchView = [[UISwitch alloc] init];
            switchView.on = [FYDefaults boolForKey:FYSwitchUserDefaultsKey];
            [switchView addTarget:self action:@selector(switchChangeAction:) forControlEvents:(UIControlEventValueChanged)];
            cell.accessoryView = switchView;
            cell.imageView.image = [UIImage imageNamed:([FYDefaults boolForKey:FYSwitchUserDefaultsKey] == 1) ? @"unlocked" : @"locked"];
        }
        cell.backgroundColor = [UIColor whiteColor];
        return cell;

    }else{
        return %orig;
    }
}

%end
最后的效果
6、为什么Monkey这么牛逼
查看重新编译后的app文件,可以发现其中的Framework多了很多东西:
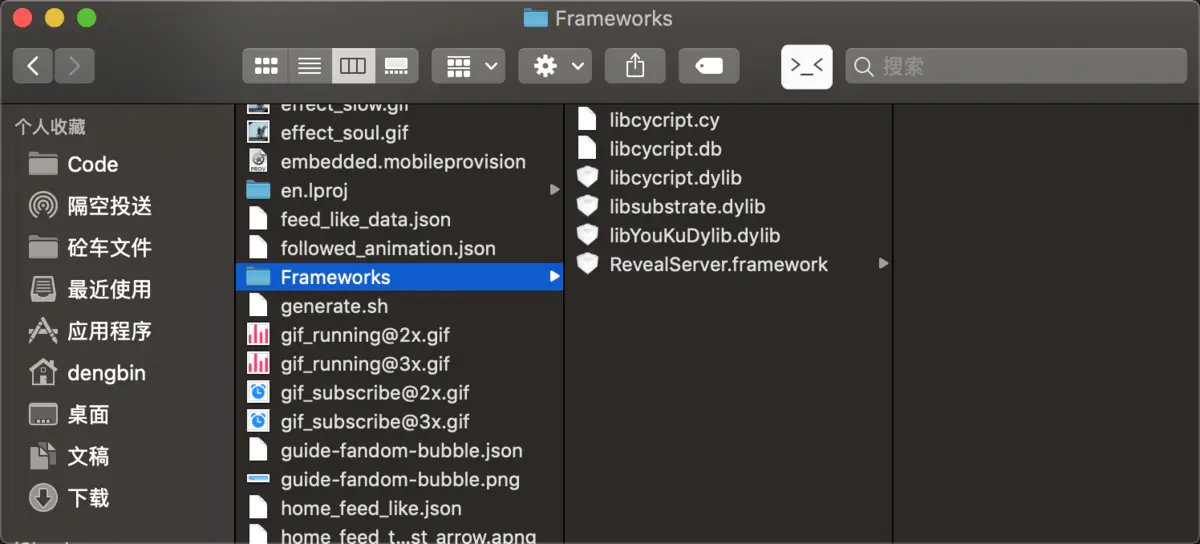
从这可以得知,原来Monkey其实也是通过将诸多的动态库(包括自己的工程)注入的形式,实现了这些功能。
三、总结
在这片文章中主要介绍了Monkey的一些用法已经Logos的基本语法。而在上一篇其实留了一个小尾巴,就是Cycript,笔者将要在下一篇文章中重点讲解Cycript的安装,基础用法和高级用法。之所以放在下一篇,是因为Cycript配合Monkey将会有事半功倍的效果。
链接:https://www.jianshu.com/p/da6cb32a1416
